This page refers to an older version of the product.View the current version of the online Help.
Database
SQL Server AlwaysOn is the preferred SQL Server technology to support High Availability/Disaster Recovery screnarios and User Workspace Manager 10.x servers have been optimized to support this technology.
SQL mirroring is available for User Workspace Manager 10.1 FR1 customers who are currently in the process of transitioning to AlwaysOn technology.
SQL AlwaysOn
Guidance on configuring SQL Server AlwaysOn Availability Groups can be found here:
- Overview of AlwaysOn Availability Groups
- Prerequisites, Restrictions, and Recommendations for AlwaysOn Availability Groups
- Configuration of a Server Instance for AlwaysOn Availability Groups
- Creation and Configuration of Availability Groups
The whitepaper on SQL Server High Availability and Disaster Recovery can be found here:
If you have configured SQL AlwaysOn with multi-subnet failover availability groups, you must configure the MultiSubnetFailover value in the database connection string for the relevant listener. This can be done using the Server Configuration Portal or Powershell cmdlets.
For more information on configuring the database connection string, see Setting Up a New Server and Database in the Server Configuration Portal Scripting Guide.
SQL Mirroring
SQL Database mirroring is a strategy which ensures data resiliency by maintaining a real time copy of a database in a mirror SQL Instance. In the event of a failover, this standby database can be employed to provide immediate restoration of service.
The originating server is known as the principal and the standby is known as the mirror. Data is automatically synchronized between the two so the mirror is fully up to date when required.
If set up in accordance with Microsoft best practices, SQL mirroring is supported by Ivanti User Workspace Manager.
A witness server is required for automatic failover. Without the witness a manual changeover is required.
SQL mirroring is supported on SQL Server 2012 and 2014 but not SQL Express edition.
Using SQL mirroring with User Workspace Manager Servers
The User Workspace ManagerServer allows the user to add extra parameters to the database connection strings. This can be used to add the Failover Partner parameter so that in a mirror configuration, the User Workspace ManagerServer automatically switches over when the principal fails or is switched over.
Automatic failover requires a witness server as well as the mirrored pair.
Setting up SQL mirroring with User Workspace Manager involves the following steps:
- Initial Installation of the Management Server
- Prepare the Principal and Mirror Database
- Database Mirroring Setup
- Management Server Setup
Initial Installation of the User Workspace Manager Server
The User Workspace ManagerServer should initially be configured to point to the principal database. The Server Configuration Portal (SCP) used to install the database sets up the config files to contain details of the principal database.
If the SCP is run after installation when the original principal is acting as the mirror, it will be unable to connect to the database as the SCP does not recognize the failover configuration.
Connection errors will occur resulting in database variances. If you are switching databases, the web.config must be manually edited to remove the failover partner.
To ensure the services have access to both instances of the mirror pair:
- The service account must use windows authentication
- A domain user must be used.
For more information on the SCP see the Server Configuration Portal Help.
Prepare the Principal and Mirror Database
- Run SQL Server Management Studio on the server hosting the principal database.
- Right-click the management server database in the Object Explorer and select Properties.
- In the Database Properties dialog, select the Options page.
- Select Full from the Recovery mode drop-down.
- Click OK.
- Once the recovery mode has been set to full, back up the database and the transaction log.
- Create the mirror database on the mirror server by restoring the full backup followed by the transaction log. Ensure the RESTORE WITH NONRECOVERY option in the Restore Database dialog is selected for each restore.
For further information about restoring databases, refer to the SQL Server Management Studio online help or SQL Server documentation.
Database Mirroring Setup
It is recommended that each SQL Server service is running under a domain account as each database has to have a login for the other SQL Server services.
- Run SQL Server Management Studio on the server hosting the principal database.
- Right-click the database in the Object Explorer and select Task > Mirror.
- Click Configure Security to access the Configure Database Mirroring Security Wizard.
The wizard sets up the principal and mirror server instances.
For further information about how to set up database mirroring refer to the SQL Server Management Studio online help or SQL Server documentation
Management Server Setup
Once the mirrored pair has been setup, you need to configure the Management Server to enable it to use the failover partner when required, this is done by the following PowerShell commands:
Import-ApsInstanceModule -ProductName "Management Server" -IsDefault
$pw ="Password"| ConvertTo-SecureString -AsPlainText -force
$sc = New-Object System.Management.Automation.PSCredential ("Domain\Username",$pw)
Set-ApsServerDatabase -DatabaseConnection NameOfConnection -ServiceCredential $sc -ConnectionString "Failover Partner=NameOfFailOverServer"
If the database exists within the default SQL instance (MSSQLServer) do not specify "Server\MSSQLServer" in the web.config.file as mirroring will not work. To use the default SQL instance, specify only the server name.
For example, if your server "SVR_2k8_01" exists in the default instance, specify "SVR_2k8_01", not "SVR_2k8_01\MSSQLServer".
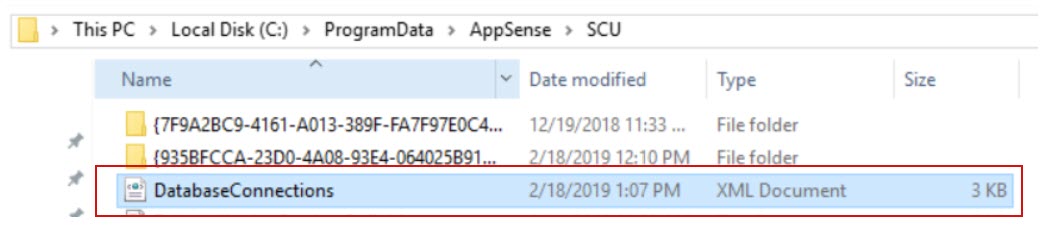
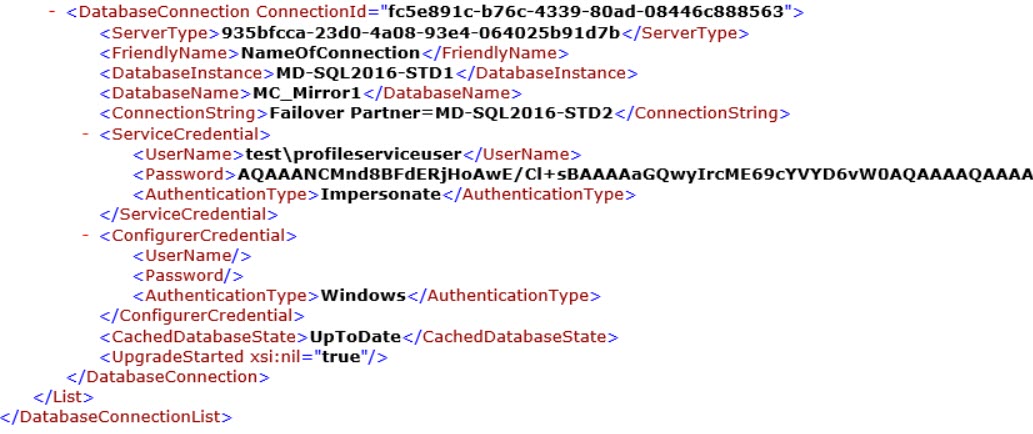
When the failover partner Powershell command has run successfully the file that gets updated is the databaseconnections.xml.
A failover connection is added when the PoSh command is run:
The Server Configuration Portal would look like this, which is expected as there is no configuration account details on the failover connection:

Personalization Server Setup
Setting up mirroring does not transfer server logins to the mirror so the service account login must be added to the mirror.
- In the Object Explorer in SQL Server Management Studio, right-click the Security > Login node and select New Login.
- Enter details of the service account login and click OK.
It is only necessary to add the user as the user’s SID is already set in the database; when a failover occurs the user will have access.
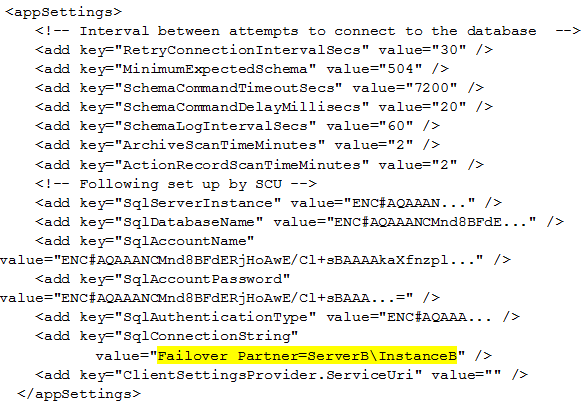
Update the web.config File
- Open the web.config file on the Personalization Server. This is usually located in:
C:\Program Files\AppSense\Environment Manager\Personalization Server\PS - Add the failover partner as highlighted in the example below.
If the database exists within the default SQL instance (MSSQLServer) do not specify "Server\MSSQLServer" in the web.config.file as mirroring will not work. To use the default SQL instance, specify only the server name.
For example, if your server "SVR_2k8_01" exists in the default instance, specify "SVR_2k8_01", not "SVR_2k8_01\MSSQLServer".
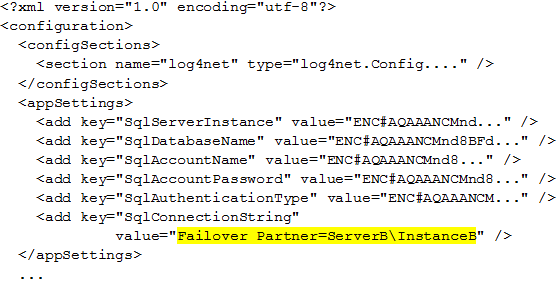
Update the BackgroundService.exe.config
- Open the BackgroundService.exe.config file in the Bin folder on the Personalization Server. This is usually located in:
C:\Program Files\AppSense\Environment Manager\Personalization Server\BackgroundService - Update the file as highlighted in the example below: